How to use DDNS for IP Camera DVR/NVR?
If you want to access the IP camera or DVR/NVR, and you don't have a static public IP address, then you have to use the DDNS service. DDNS is one of basic function for IP camera, NVR and DVR. After you set up the DDNS properly then the these devices are able to access on Internet from anywhere. Typically, you can find many free DDNS service providers which basically provide you reliable DDNS service. Today, we are going to share with you some information on this topic.
#1. What's DDNS?
DDNS is the abbreviation of dynamic domain name system which is used for the conversion of dynamic public IP address from domain names to the numeric format. The dynamic domain name address was supplied by DHCP server of your ADSL service company.
#2. The working theory of DDNS
On the DNS server, the domain name has to point a static IP address. Most of residential users don't have a static IP, the IP is changed periodically. Hence, it's impossible to use the DNS server for dynamic IP addresses. Once the IP number changes, the DNS data ceases to be valid.
The solution is offered by DDNS service. Much like DNS server, it offers a database containing relations between domain and IP addresses, however this database can be updated on request by the domain operator. Because of this specific function, the server is available in the domain address in spite of its actual IP address. In such a case, the access to the server is limited to its domain name translated by DDNS server, unless we know its actual IP address (but of course we don't know how long it's going to be valid).

1. Your IP addre is 183.13.182.196
2. uniforesecurity.ddns.net is now 183.13.182.196
3. What is the current IP address of uniforesecurity.ddns.net?
4. uniforesecurity.ddns.net is now 183.13.182.196
5. Hello, 183.13.182.196 send me your website content
6. Here it is!
7. Your IP address has changed to 58.60.3.93
8. uniforesecurity.ddns.net is now 58.60.3.93
9. What's the current IP address of uniforesecurity.ddns.net?
10. uniforesecurity.ddns.net is now 58.60.3.93
11. Hello, 58.60.3.93 send me your website content
12. Here it is!
We need to keep in mind that when DHCP server changes the IP, it will take some time to find this change by the software or network router, and, after the notification is sent to DDNS server, it will take another minute or so to deliver this piece of data to DNS server to update the database. As a result, the server will be periodically inaccessible up to several minutes, every time the IP address has been altered.
#3. How to use no-ip.com free DDNS
Obviously, before using the DDNS service, you have to register an account. Go to top five free DDNS providers and register your account. Since the no-ip.com is a reliable free DDNS provider, we are going to teach you how to register and use its DDNS step by step.
Firstly, you need to create an account in No-ip.com, run your Internet browsers, then visit no-ip.com, click "Sign up" for account creation.

In the next page, fill in the following boxes:
- Username
- E-mail address
- Password

Then, click "Free Signup" for applying free account. No-ip will send you an account verification E-mail for account verification.
Go to your mailbox, click the verification link to verify your account, then click "login"

To create a new DDNS host name, click on the image shown below.

Enter your desired host name, then choose domain name from provided list e.g. ddns.net, then select DNS Host (A), and Click "Add Host."

After created the host, you can see its IP address.

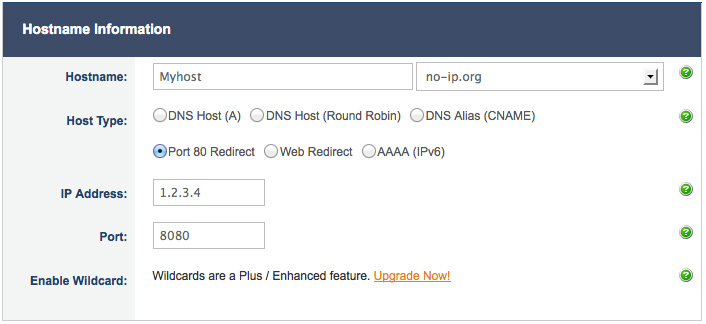
Please note that If your IPS blocks port 80, you need to use [Port 80 Redirect] and select no-ip.org host.
Use our port redirect feature listed under the modify host page to navigate around a blocked port 80. Set the IP address and the port you would like http requests sent to. If your IP address is dynamic (one that changes and is not always the same) be sure to select this host.
#5. How to set the DDNS account for NVR
Congratulations, you have successfully created a free DDNS account. When we type the free domain name (http://uniforesecurity.ddns.net), it will display error page or blank page. The reason is you haven't assigned an valid port (80) to your NVR's IP address.
Open the router configuration page (factory default: http://192.168.1.1 Login: admin, Password: admin), then navigate to "Virtual Servers" menu. Enter your NVR's IP address (example: 192.168.1.188), then input the port: 80, then click "Save/Apply".

Next, login your NVR (either via web interface or GUI), go to "Network Parameters" > "DDNS Settings" , tick enable DDNS, then choose No-ip from provided list. Fill in the form with your free DDNS account information.
- Server name: any name, e.g. www.noip.com
- Port: 80
- UserName: uniforesecurity (your DDNS account name)
- Password & confirm pwd: your DDNS account password
- Domain: your free domain, e.g. uniforesecurity.ddns.net

After complete above steps, you can visit your NVR with the free domain (e.g. http://uniforesecurity.ddns.net) in anywhere.
#6. Configure DDNS on Router
After the DDNS account creation, you can configure the TP-LINK TL-W8950N N2908 router.
Open the router configuration page (factory default: http://192.168.1.1 Login: admin, Password: admin), then navigate to "Advanced Setup" > "DNS" > "Dynamic DNS bookmark" and click "Add".

In the appropriate box choose the provider (No-IP), then enter host address, login (email address) and password. Click "Save/Apply".

Get My Latest Posts
Subscribe to get the latest updates.
Your email address will never be shared with any 3rd parties.
Tags: IP Camera