Chinese HD network video recorder (NVR) troubleshooting
HD network video surveillance system becomes more and more popular, many consumers choose to use network video recorder for professional video storage and management. Since the rapid development of technology, installing and operating NVRs become super easy. However, you may still encounter some problems when you play with them, especially to those NVRs from Chinese manufacturers. Troubleshooting NVRs can be tricky and frustrating. In this article, we list common problems and solution for HD network video recorders.
1# Super Mini NVR can't register UID with Goolink
Hello, I bought a Super Mini NVR and when trying to register with goolink.org it always gives me the message "Notice:Wrong ID, another one please!". I have read somewhere that a new specific firmware upgrade can solve this. Can you help please? System info says "Master Version: V4.0[20150124], Hardware Version: V4.0".
Making sure that NVR's DNS setting is the same as router's DNS. Additionally, you may upgrade the NVR's firmware to solve it. You can download the latest update for Super Mini NVR from here: http://support.hkvstar.com/file/goolink_P2P_2015-06-10.update
March, 2016 update
{josociallocker} https://drive.google.com/open?id=0B6hOMc9JdNOtLXN3cHdtblFwODQ
https://drive.google.com/open?id=0B6hOMc9JdNOtOWJyMjJJdFdHTDQ {/josociallocker}
2# After added camera successfully, NVR couldn't display images/video
Both IP cameras and the NVR connect to same LAN network, also NVR can find IP cameras, we can add IP cameras to NVR successfully. However, NVR can't display image in both split screen (multiple channels) mode and 1 channel screen; or multi-screen shows images, but 1 channel screen or playback can't display image or images freeze.
The HD network video recorders are compatible with different brands network camera. In order to make them work together, it's important to select correct stream type. Login NVR, go to [Setting] > [Device] > [Device info] > [Stream Type]

All the above mentioned problems are relevant to the setting of [Stream Type]. There are lots of stream type for selection, for example, you can choose 4x[1280x720]*sub[720x576]*4Ref.+4Main
- 4x[1280x720] = 4 channel main stream, resolution is 1280x720
- sub[720x576] = Sub-stream resolution is 720x576
- 4Ref. = NVR reference frame that NVR can access to network cameras
- 4Main/Play = 4 channel playback
a. NVR can find IP cameras, but can't display images
You need to select the correct stream type. "4Ref" is mandatory to Ambarella based network cameras (such as Hikvision, Dahua etc). Making sure that network camera and NVR are in the same network (LAN). Checking the username and password if they are correct. Lastly, ensuring the network camera and the NVR have latest firmware.
b. One channel screen displays image, but 4/8/16 split screen view doesn't display image
You may select wrong stream type, you need to choose the stream type that has correct sub-stream (720x576). Making sure that this sub-stream matches the sub-stream of network camera. Additionally, you can access network camera web interface to adjust camera's sub-stream resolution. Resolution can be VGA or CIF.
c. 4/8/16 split screen can display images, but single-screen or playback can't display images or video image freeze.
Choosing stream type that has 1920x1080p resolution; or changing the network camera's main stream resolution to 960P or 720P.
3# How to upgrade NVR's firmware?
Before upgrading the firmware, making sure that you have the correct firmware. To upgrade the firmware, you need to prepare a USB flash drive. To upgrade the firmware, you may take the following steps:
- Get to know firmware version: Login NVR, go to [Setting] > [Device] > [Device Info] to know NVR's device series number. Go to [Setting] > [System Version] > [Master Version]
- Unplug network camera from RJ45 of NVR
- Reboot the NVR
- Download firmware into USB flash drive, and plug USB flash drive to USB port of NVR.
- Login NVR, go to [Setting] > [System] > [Update], browsing files in USB flash drive, then choosing the update file to upgrade. Please don't turn off the power of NVR or making other operations when upgrading.
4# SATA port version in NVR?
The version of SATA port depends on which SoC has been used in NVR.
Hi3535: SATA 3.0, Hi3531: SATA 2.6, Hi3520: SATA 2.5
5# NVR can't discover any IP camera
- Checking the network LED indicators in NVR and IP camera, making sure they work properly
- Using IP canera search/finder software to check if IP camera can be found
- Ensuring there is no IP address conflict, both NVR and IP camera should be connected in the same local network.
If NVR uses ONVIF protocol can't find network cameras:
1. NVR connects to router through an Ethernet cable: NVR only can find network cameras that have already connected to same router via hardwired Ethernet cable; It can't find network cameras that connect to router via WiFi.
2. NVR connects to router through WiFi connection: NVR can find network cameras that have already connected to same router via wireless WiFi connection, it can't find IP cameras connect to router via hardwired Ethernet cable connection.
6# NVR can't boot or failed to upgrade firmware
If you failed to upgrade firmware or NVR could not boot, you can make a bootable USB Disk for NVR. Once you can temporarily access NVR, you can continue upgrading/updating.
1. Download the system files (include 8CH Mini NVR update firmware) from here: http://support.hkvstar.com/file/Super_Mini_NVR_USB_Boot.zip
2. Extract the compressed file, copy them to the root folder of USB disk
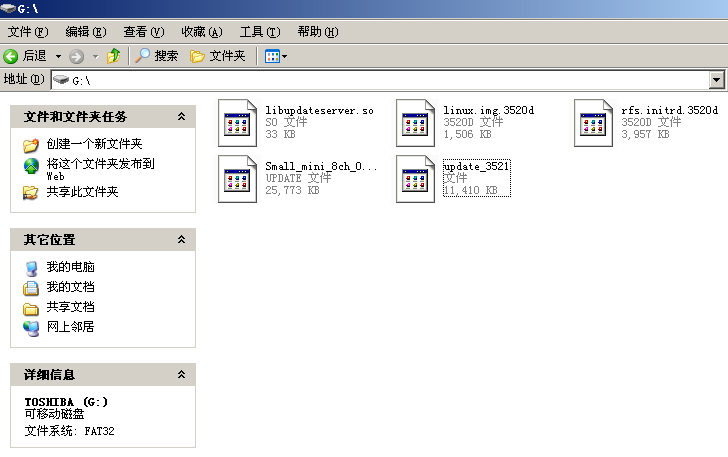
Making sure that the root folder of USB disk includes linux.img.3520d , rfs.initrd.3520d, update_3521, libupdateserver.so files.
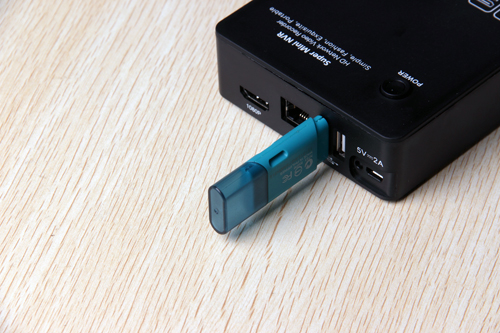
3. Plug the USB disk to NVR, then turn ON NVR.
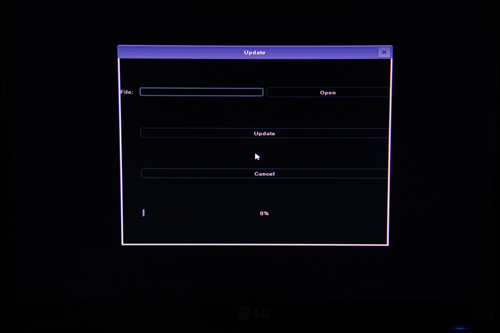
4. Click "Open" to browse files, select ".update" file (i.e Small_mini_8ch_0153_3520d_A_web_nor_2015-01-24.update) to upgrade the firmware. Click "Update" to begin updating.
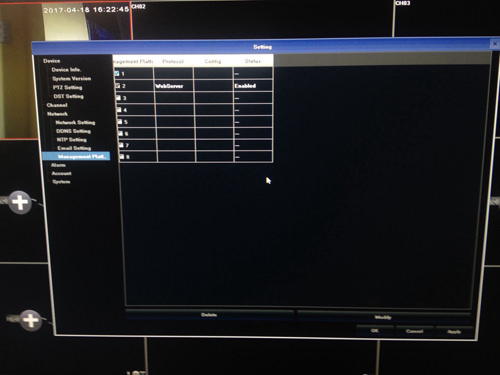
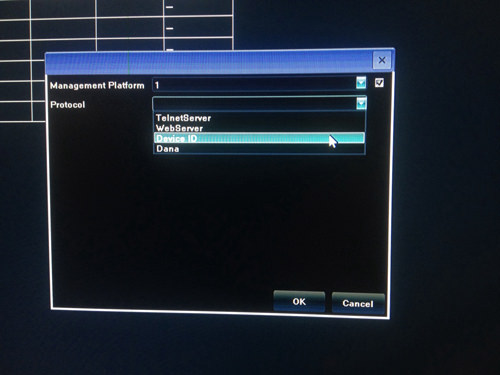
7# After reset the NVR, the QR code disappeared from the GUI of the NVR
This error happens because the P2P function is disabled as the default setting. To enable the P2P function, users need to click [Settings] > [Network] > [Management Platform], then modify the first platform and enable "Device ID". By the way, if you want to use the Danale App, then you should choose "Dana".
Get My Latest Posts
Subscribe to get the latest updates.
Your email address will never be shared with any 3rd parties.