How to connect IP camera to alarm system?
Why many residents won't buy the home alarm system for monitoring? The reason is not only correlated with the expensive cost for monitored alarm equipment, and installation fee, but with correlation of the high false alarm rates. Many users may experience a false alarm rate of approximately 80%, high false rate leads to both users and central monitoring station overwhelmed with false alarm. In order to solve this problem, first of all, you need to buy high quality equipment with reliability and lowest false alarm rate, as well with proper installation and usage. The other effective way is using alarm verification procedures.
Typically, traditional alarm systems are only sending text message to either home owner or central monitoring station, once an alarm is triggered. Both of them can't use the limited information to verify the alarm information unless call back for verification. What if there is nobody at home for picking-up the phone?
Therefore picture and video verification plays important role for home and business monitoring. Today we are showing how to connect IP camera to our security alarm system. Herein we are using the most traditional IP camera which has advantages of inexpensive and has basic PTZ function and more functions.
Before follow below steps, you should note that the IP camera and alarm system must have alarm I/O (input and output), also support snapshot upload and E-mail sending for the IP camera. We think almost IP camera in the market can meet this requirement.
Connection between IP cam and alarm
Making the hardwired connection between the IP camera and alarm. You need to use the alarm relay output from alarm system, and connects to alarm input of IP camera. Just using two wires (such as telephone cable) for this connection. Please note that different from hardwired zone connection, you should not use EOL resistor for this wiring.
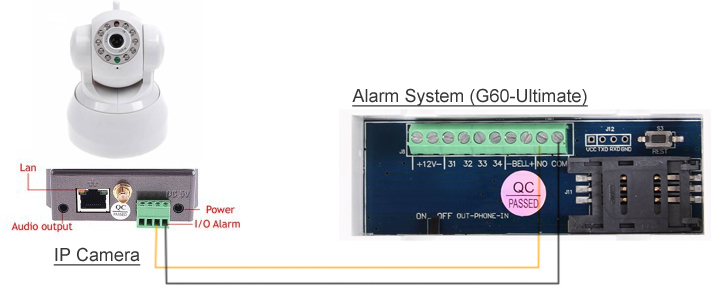
Configuration on IP camera
After the correct hard wiring, you need to setup the IP camera for network connection. Similar to any network device, after power on the IP camera, you need to setup the network configuration for proper working of IP camera. Using the wizard, you can config it without difficulties.
If the wizard procedures can't perform normally, you can use the manual configuration to setup the IP address, Submask, Gateway, DNS.
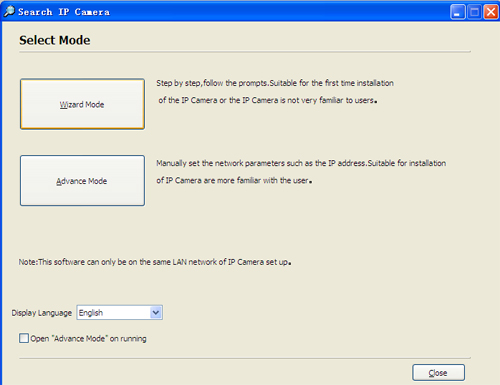
After the successful of network configuration, you can access the IP camera via internet browser (IE, Chrome, Safari) with a static IP address such as http://192.168.1.126:81 (81 is the port for accessing, it should be included while inputting in url address).
Now using the default account (For example: admin, password is empty) to login. The webpage will show up real time monitoring screen. Now you can watch the video footage in real time. Click the "SET" button on the window, and you will navigate to function and configuration window.
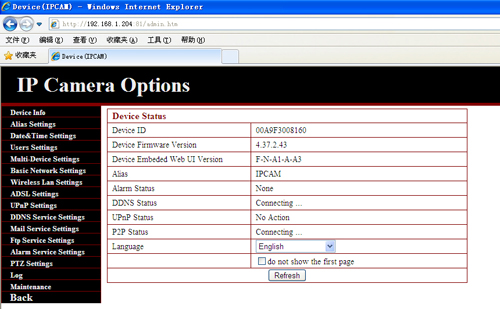
Config E-mail snapshot for IP camera
Before receiving the E-mail alert with snapshot, you need to config E-mail service in IP camera. Typically, majority of free E-mail service providers (like Gmail, yahoo, mail.com, yandex, mail.ru) can offer free SMTP service. Using these smpt mail service, the IP camera can send E-mail to designated E-mail addresses for alert receiving. The E-mail will contain snapshots from IP camera.
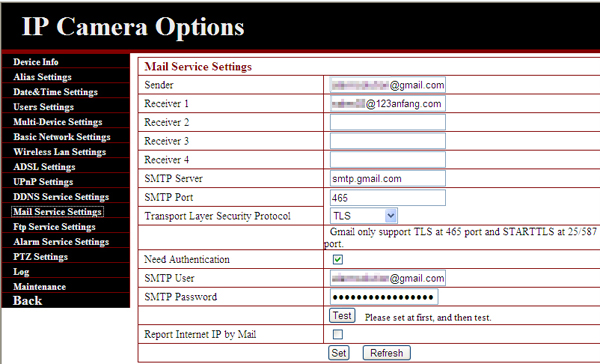
For instance, we are using Gmail account to send the snapshot, now we need to find the configuration of smtp for Gmail.
SMTP server (i.e., outgoing mail): smtp.gmail.com
SMTP username: Your full Gmail or Google Apps email address (e.g. example@gmail.com or example@yourdomain.com)
SMTP password: Your Gmail or Google Apps email password
SMTP port: 465
SMTP TLS/SSL required: yes
Yahoo! Mail SMTP server address: plus.smtp.mail.yahoo.com
Yahoo! Mail SMTP user name: Your Yahoo! Mail user name
Yahoo! Mail SMTP password: Your Yahoo! Mail password
Yahoo! Mail SMTP port: 465
Yahoo! Mail SMTP TLS/SSL required: yes
Before using the SMTP service, you should go to your mail account to enable SMTP function.
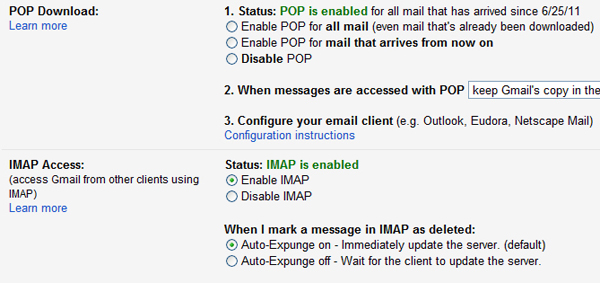
Using Alarm Service in IP Camera
After the successful configuration of E-mail/SMTP setting in IP camera. Now we navigate to [Alarm Service] to use the alarm input and output of IP camera. The alarm functions including motion detection alarm armed, alarm input armed, IO linkage on alarm, Call preset on Alarm, Send Mail on Alarm, Send Alarm Notification by Http, Upload (ftp) image on Alarm, Scheduler.
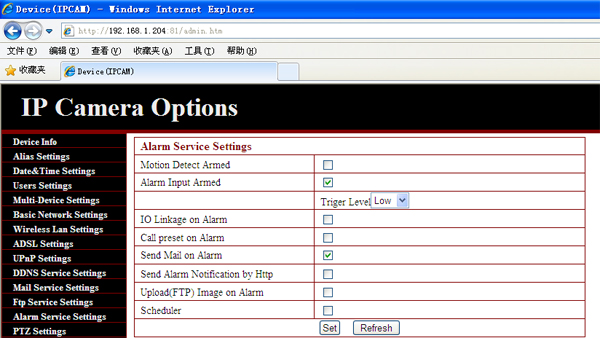
We herein select [Alarm input Armed], and [Send Mail on Alarm]. Therefore when the alarm input receives alarm signal for wireless alarm system, it will capture real time snapshots, and send to E-mail address. Explanation for these functions:
Motion Detect Armed: Enable the motion detection function, the working theory is based on pixel changes in monitoring area. Therefore high false alarm rate, not recommend for real usage.
Alarm input Armed: Enable alarm input of IP camera, when receive the signal, it will capture snapshots. Because home alarm system is the best intrusion detection equipment, therefore we recommend use this function for alarm verification.
IO linkage on alarm: Cooperation with camera's motion detection, and send signal out from alarm output of IP camera, it can connect to a siren (not recommended).
Send Mail on Alarm: When IP camera received the alarm signal, it can capture several snapshot and deliver to maibox.
Send Alarm Notification by Http: Unknown function
Upload (ftp) image on Alarm: Capturing snapshots, then upload to ftp account.
Scheduler: Allowing user to setup schedule for both motion detection and alarm input activation.
Using this function in alarm system
Typically, majority of alarm system has alarm output. After have done above mentioned configuration, when your home alarm system is triggered, you will receive the phone call or text message, at same time you will receive snapshot for alarm verification.
Request snapshot via SMS/Smartphone APP
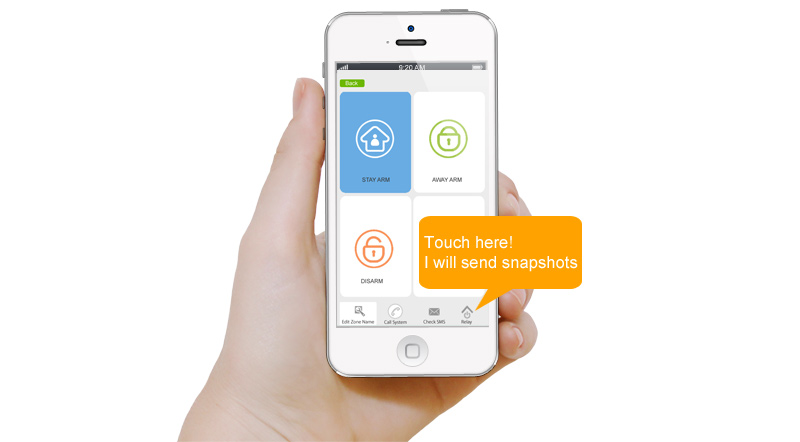
Different from other traditional alarm system, the latest G60-Ultimate alarm system has one SMS controllable relay output. Using the smartphone app or SMS, you can activate this alarm output, and sending you with snapshots while you touch the [Relay] button on APP.This function is only available for our G60-Ultimate alarm system.
At last, you may want to access the IP camera via internet, after have done above procedures, you need can access the IP camera through LAN network. For internet accessing, you need to do port forwarding procedure over your router. You can read more about it from this article: http://www.hkvstar.com/technology-news/how-to-install-ip-cameras.html
Tags: Alarm installation