How to install IP cameras ?
Do you want to know what exactly happen in your house or your business, shop, office? Without any hassle, IP cameras allow you to keep an eye on what it is going on in the specific location. Once the IP cameras are installed at residential and connected to internet, you can remotely monitoring from any PC in the world, as long as there is internet connection.
For example, you can watch the kids while you are with friends, or just watch the house in your absence. Even better, some IP cameras even allow you to send an email notification when the camera detects motion.
Please note IP cameras are not computer cameras: they do not work with any video message chat software such as windows Live Message or Skype. They can only be viewed via a web browser or video management software. To install them, it’s essential to have a permanent internet connection, a router and a PC (which only used during installation). The camera can operates autonomously, even when the PC is off. To simplify the installation of camera, you can use the Wi-Fi routers for wireless connection.
In this article, we choose the D-Link IP camera. This IP camera has the advantages of being able to connect with either wired Ethernet network or a Wi-Fi connection.
Step 1: Install the camera
In this article, we choose the D-Link IP camera. This IP camera has the advantages of being able to connect with either wired Ethernet network or a Wi-Fi connection.
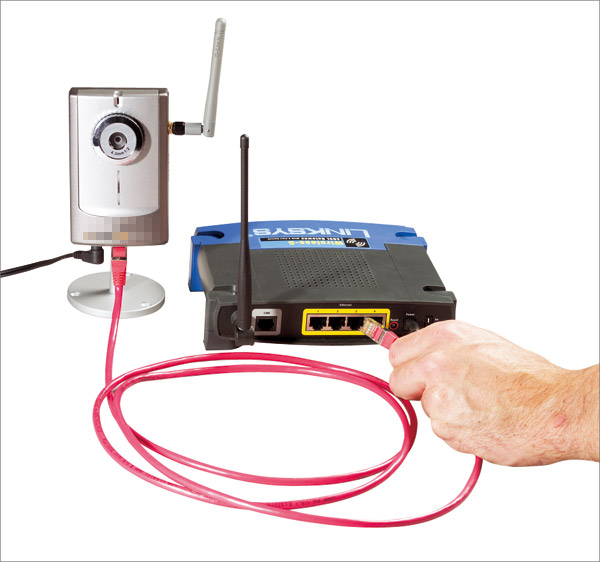
Even if you intend to connect your camera in Wi-Fi wireless connection, you must begin to connect it to the router via a Ethernet cable (RJ45). This is the only way to access the configuration software in camera. For this, you need use the Ethernet cable connect between camera and a LAN port on the router. Also make sure you connects it to power supply.
If you want to use Wi-Fi, make sure connect the Wifi Antenna to the IP camera.
For some camera, you may need to reset the camera, using a sharp tool or a very thin screwdriver, press the reset button on the back of camera. This will reset the camera to its factory mode.

Step 2: Config the network in camera
1. Turn on your computer, wait until you start-up windows, and then insert the software CD into the drive (if your computer does not have CD drive, you can use USB sticker to copy the software file). When the computer popup windows, click “Setup” on wizard screen. In the installation wizard starts, click “Next” and “Finish” button.
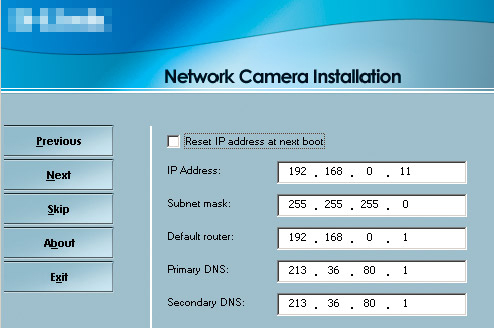
2.2. Double click the software icon appeared on the desktop. A window will appear and shows the features of your camera. Take note on a paper for the IP address, because you need to use it. This IP address was automatically assigned by the router. That’s good, but the problem is every time you reboot the camera, the camera maybe assigned a new IP address which disrupt the settings you make in the rest of configuration, so we advise to input a fixed IP address.
2.3. Uncheck " Reset IP address at next boot", then you are able to make the configuration for the IP address (example: input the IP address with 192.168.0.11), make sure the IP address is unique in the LAN network.

Step 3: Make the configuration on router
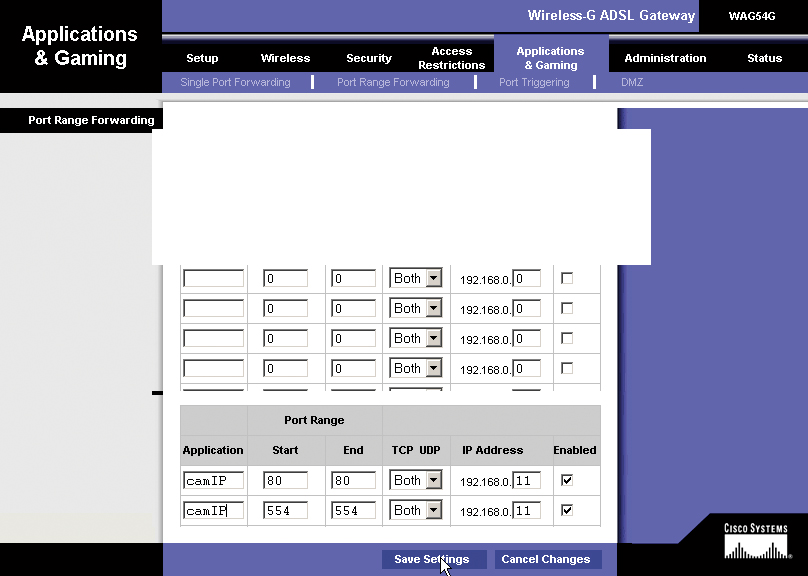
You need to config the router to open internet port used by your camera. This is the default ports 80 and 554. It depends on your router. To access the router setup age, you need enter the IP address like 192.168.1.1 or 192.168.0.1 in a web browser.
Login window will popup, then you need login with account and password, you can find these information from user manual of your router or ISP. Find the option called “Port forward” or “Port range forward”. This is where you need config to open the port of camera.
Fill the correct information in port range column, Application should be filled with IP Cam, and Start and End should be input 80, IP address should be 192.168.0.11, also check Enable

Step 4: Test and remotely monitor your home
Now you can access your IP camera from anywhere as long as there is an internet connection. Simple type the IP address of your IP camera in a browser to access real time video. You will see the browser will display black square, it requires installation of ActiveX control. Once you installed the ActiveX control, you can watch the video online.
At last, you also can use the DDNS function, that allows you visit the IP camera with a domain name. Go to no-ip.com and dydns.com you can register the free domain, and make the configuration on your router, then it will work.
Tags: IP Camera Installation